
Scratch Documents
Need to quickly create an annotated screenshot? Do some quick calculations? Try using scratch documents!
Throughout our work day we have to do small tasks that don't warrant creating yet another document. We usually end up creating that document just so we can get the job done quickly. A couple of years ago I started the school year by creating a scratch Google Sheet and using that sheet throughout the year when I needed to do a quick calculation, format some text, or just hold onto some data. This year I've added a Scratch Google Slides document. The Slides document is used to annotate screenshots or to create graphics for documents. My examples use the Google Workspace apps, but this idea works in whatever you use the most.
I create each of the documents at the start of the school year. Their names start with the current school year and then Scratch along with what they are. My two files for this year are 23-24 Scratch Spreadsheet and 23-24 Scratch Slides.
Scratch Spreadsheet
This was my first scratch document, created because I use formulas and functions a lot on a daily basis, but I don't need to create a new document for each task. The spreadsheet is also used to save my favorite formulas for easy re-use. I usually pick some empty cells on the first or second sheet and use those to complete whatever task I have at hand.
However, some tasks do require more work, and for those I add a sheet onto the spreadsheet. For this year I'm up to 14 different sheets in the spreadsheet. Don't be afraid to add more sheets if you need them, you can have 200 sheets in a Google Sheet and 255 in an Excel Workbook.
Scratch Slides
New for this year, I use my Scratch Slides to annotate screenshots. In the past, I looked at different ways of doing this with different screenshot tools, but by using Slides I have a lot more flexibility.
To annotate a slide, I take a screenshot and copy it to the clipboard. I then switch to Google Slides and create a new blank slide. On this blank slide I paste the screenshot. Now I can mark up the screenshot using the shape tools and text box tool. To create consistent looking screenshots I will copy already made shapes from other slides and paste them onto my new screenshot. This saves time because I’m not constantly setting colors and fonts.
The flexibility of using Google Slides is the ability to place multiple screenshots on one slide. In the past I would take a screenshot of each step, and then the final document would have each of these screenshots making it a lot longer and more involved than it should be. Now I can combine steps onto one slide. For example, here are the steps to check whether your iPhone is backing up to iCloud:
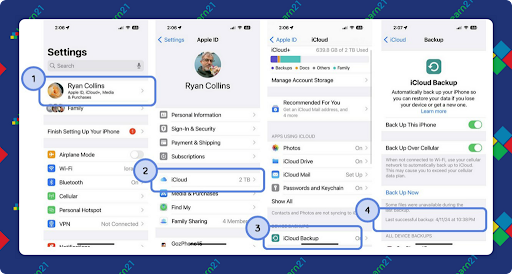
When my annotation is complete, I take a screenshot of it and paste it where it needs to go. You can download the slide itself as a graphic, but why add steps?
Other scratch documents?
Now that you know about scratch documents, where else could you use them? Let us know! Share your tips and ideas with us at newsletters@learn21.org
Tips and Tricks
Taking Screenshots
My main reason for using scratch documents is for annotating screenshots, but how do we take our initial screenshot? Here’s how to take screenshots on the various operating systems you may be using. Each OS has a built-in tool that you can access through a keyboard shortcut to create a screenshot.
ChromeOS & Chromebooks
Buckle up because Chromebooks have a few different shortcuts, depending on what keys are on your keyboard. There are two Chromebook keys of importance:
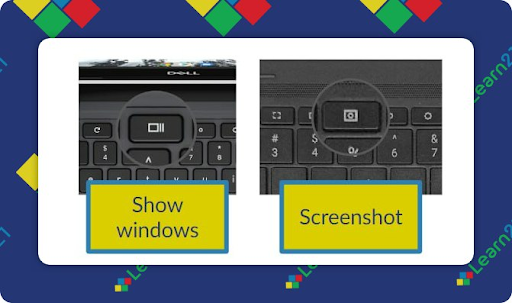
The keyboard shortcut depends on which keys are available. You can capture the entire screen with the following three shortcuts:
- {Screenshot}
- {Control}{Shift}{Show windows}
- {Control}{Shift}{F5}
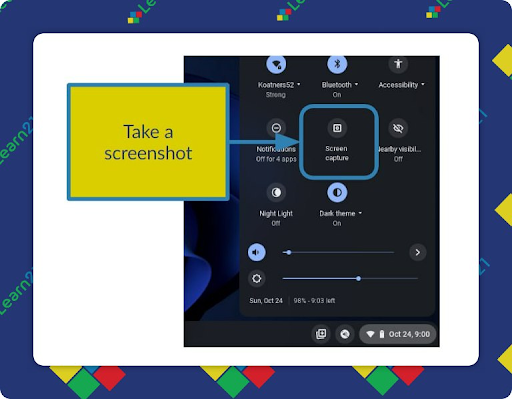
Clicking on the clock brings up the ChromeOS menu which also has a option to take a screenshot:
Microsoft Windows
- {PrtSc} or {Prtcn} - Capture entire screen
- {Alt}{PrtSc} - Capture specific window
- {Shift}{Windows}{S} - Select area to capture
macOS
- {Control}{Command}{Shift}{3} - Capture entire screen
- {Control}{Command}{Shift}{4} - Select area to capture
(If you drop the {Control} key from the shortcut your screenshot will be saved to your desktop and not copied to the clipboard.)
Other tools
There are more things the built in tools can do along with several apps that add features. Since I take a screenshot of my annotated Slides graphic, these tools make things such as sharing to different services easier.
- Greenshot - (Windows/macOS($)) - My go to tool, supported on Windows and Mac. After taking a screenshot you can customize what you want to do with that screenshot, including add annotations.
- Flameshot - (Windows/macOS/Linux) - Powerful free, open source software with a ton of customizability.
Modifier Keys
One tip that we probably should spend more time teaching is the difference between modifier keys and typing keys. It’s just something we assume people learn, which they do at the expense of learning what each does.
There is more to using a keyboard than just pressing keys to get what you want. The action of typing consists of two steps, key down and key up. When you press a key that is key down, and when you release it, that is a key up. Why do we need to learn this distinction? Because keys act differently depending on their use in key down and key up.
Typing keys are those that enact an action on the key up step. Pressing the “A” key and letting it up inputs that letter. On the key down nothing happens, but if it’s held down, the key will start repeating.
Modifier keys are tricky and confusing. These keys include the {Shift}, {Control}, {Alt/Option}, and the {Windows/Command} keys. With a few minor exceptions, these keys don’t do anything on the key down, held down, or key up step. For someone learning how to type this can get pretty confusing.
I remember the first time I was typing on a computer. It was the late 70s and I was at the county fair where Radio Shack had a booth with a computer we could type on. As I typed on it, I couldn’t figure out how to type capital letters. But after clumsily playing around with it, I figured out that holding down the shift key let me create a capital letter. For those that use typewriters, this made sense, but I was ten!
Before Chromebooks, I was baffled at the number of young students that constantly used Caps Lock to type capital letters. I finally figured out that no one had ever shown them how the shift key worked. When you press it, there is no feedback anywhere that something is happening. When you press the {Caps Lock}, a light on the keyboard comes on. They quickly found out that they could press the {Caps Lock}, then type the letter they wanted to capitalize, and then press {Caps Lock} to turn it off.
For keyboard shortcuts we rely on the modifier keys to change how the typed key works. Nothing happens when you hold down these keys, so in the following examples, feel free to hold down {Shift}, {Control}, {Alt/Option}, and the {Windows/Command} for as long as you want because the computer won’t do anything until you hit the final typed key.
Learn21 Update
Introducing Learn21's Media Literacy Minute
Did you know that we are exposed to over 5,000 media messages a day? With an omnipresent media, the ability to critically engage with the information we encounter has never been more crucial. With misinformation on the rise and digital media consumption at an all-time high, media literacy is a fundamental skill. That’s why we’re excited to present our weekly series, Media Literacy Minute, dedicated to showcasing the innovative ways educators across the United States are empowering students to evaluate, analyze, and contribute to the media landscape wisely and responsibly.
Join us on the Learn21 Blog every Monday to get your minute’s worth of the latest and most inspiring developments in the realm of media literacy. Whether you’re an educator, an administrator, or simply a lifelong learner, these insights aim to spark conversation, reflection, and action.
Here is a glimpse of what we are discussing in our Media Literacy Minute each week. We are featuring articles that are not just about teaching media literacy but are reimagining it:
👽 From Outer Space to Critical Grace: An educator’s unique approach uses extraterrestrial scenarios to teach media literacy in “Why This Educator Uses Aliens to Teach Media Literacy” from EducationWeek. Why aliens, you ask? They provide a neutral ground for students to question sources, check biases, and debate credibility without the immediate heat of real-world controversies. It’s a stellar example of creative pedagogy engaging young minds in the critical analysis of information.
🔍 Hack the Misinformation: Students at the University of Georgia took a stand against election misinformation during a “hackathon..” Grady News writes that this event is not just about coding; it’s about empowering students with the tools to dismantle false narratives and build a foundation of factual information. By gamifying the process, they develop a keen eye for authenticity that will serve them well beyond the classroom.
📰 Headlines and High Water: Finally, a program in Wisconsin demonstrates the power of journalism in teaching media literacy by encouraging students to choose their own adventure. Students in Wisconsin don’t just consume news; they create it, learning the ropes of ethical journalism while developing a discerning eye for news quality. It’s a hands-on approach that transforms students from passive receivers into active seekers of facts.
Every Monday, we’ll bring you snapshots of how media literacy is being redefined across education. If you want to dive deeper into these initiatives or discover laws and resources specific to your state, reach out to us at engagements@learn21.org or explore our comprehensive resources on media literacy at bit.ly/medialitlaws.
Video 3: Transforming Learning Environments with AI
We're excited to announce the third video in our 11-week series, "Turning Research into Practice: Leveraging Generative AI in K-12 Education."
This week we are addressing the question, how can generative AI change how we learn at school? This video will highlight the transformative potential of AI in creating dynamic, personalized learning experiences and fostering a culture of innovation and creativity in schools.
Check it out, leave a comment and let us know what you think. We're reviewing and reporting on the research to amplify your abilities. Let us know how we're doing. Oh, and Like and Subscribe while you're there.
Extra Credit
I’ve seen a lot of classrooms where the teacher has created a calming atmosphere by using warmer light and covering the fluorescents, but research is showing that bright light can increase performance on cognitive tasks.
Student voice in schools is a powerful component of a positive school culture, so what do teens say about the current state of education? The report covers social media use, how they feel about school, and more.
How has the attention economy affected society over the last 20 years? It doesn’t look good, Our attention spans are contracting (Archive) and the push for more “Attention Capture” technologies in the classroom probably isn't helping. As I read up about attention spans, I realize how my ADHD does give me superpowers in that area.
You probably think the opposite of ADHD students, that they can’t have sustained focus on a task, but that isn’t true. It’s hard for them to have sustained focus on a task that they don’t care about. Give them something they do care about and watch the hyperfocus at work.
There have been many times when I’ll be sitting in the dark when my wife comes home because I became hyperfocused on a task when the sun was out and am still in the flow. So much so that I won’t notice that I’m sitting in a dark room.
🙋♂️ Bytes and Insights is written by Eduk8me’s Ryan Collins who writes about education and educational technology. He is also the Director of Technology for Kenton City Schools in Ohio. Sign up for his Of Bits and Bytes newsletter at https://eduk8.me!